

Preview
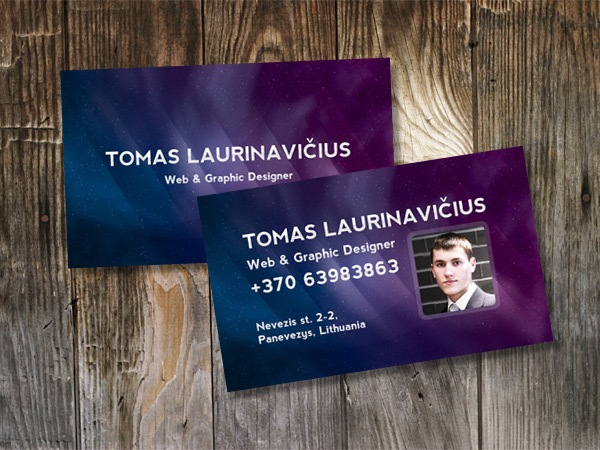
 Click the image below to see the business card in full size.
Tutorial Resources
- Font: Nevis Typeface
Step 1: Create a New Photoshop Document
Open a new Photoshop document that is 3.75 x 2.25 inches. Make the Resolution to 300 pixels/inch and set the Color Mode to CMYK Color – 8 bit so that it will be ready for print. The standard size of a business card is 3.5 x 2 inches, but to prepare the business card for printing, there needs to be a 1/4 inch margin along the edges — referred to as a bleed — that will be trimmed off so that the artwork extends to the edge of the business card without gaps when it is printed and cut.
(Read more about preparing your files for print.) 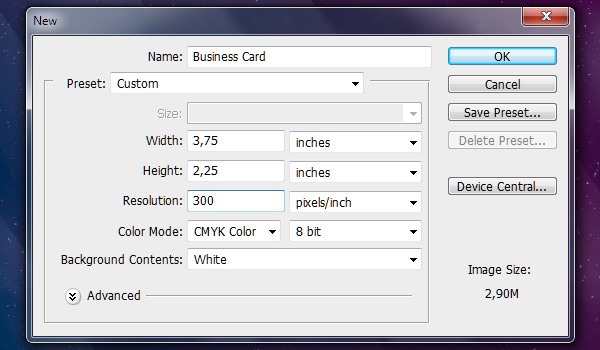
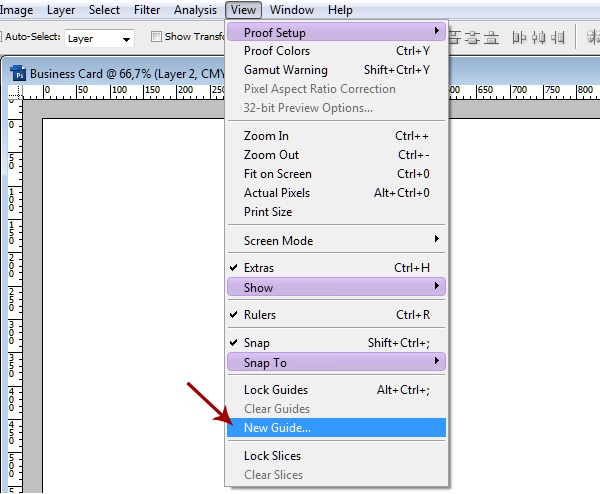
Step 2: Add Some Guides
We will use Photoshop guides to delineate our bleed area versus live area. We will add guides at all sides of the canvas to show where the bleed area is. To add guides, select View > New Guide.
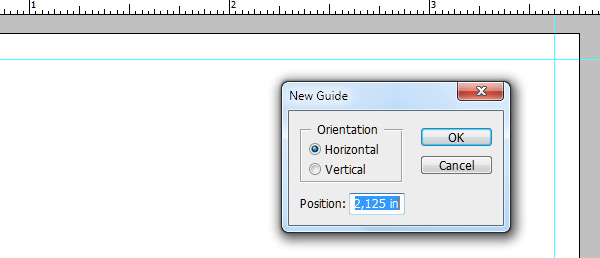
 Add the following 4 guides:
| Orientation | Position |
| Vertical | 0.125 in (left guide) |
| Vertical | 3.625 in (right guide) |
| Horizontal | 0.125 in (top guide) |
| Horizontal | 2.125 (bottom guide) |
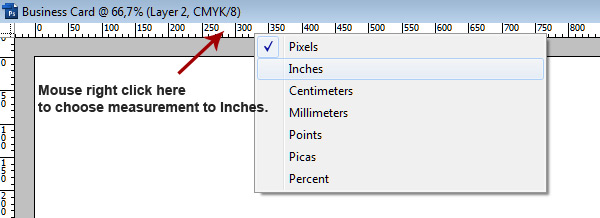
 Note: you must change your units from pixels to inches whenever you are working with print materials because this absolute unit of measurement is a standard for printers. Change your units of measurement by going to Edit > Preferences > Units & Rulers. Alternatively, you can right-click on your ruler (View > Rulers) as shown below.
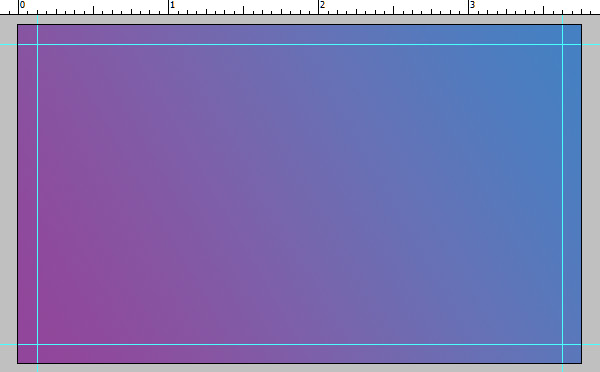
Step 3: Create the Gradient Background
Now we are going to add the blue-purple color gradient background using some different tools. First, choose the Gradient Tool (G) from the Tools Panel and then set the style to Linear Gradient in the Options Bar. Then set the gradient to go from blue (#4580c2) to purple (#91469b) and then fill the Background layer using the Gradient Tool by dragging from the right-top corner to the left-bottom corner of your canvas, making a diagonal color gradient.
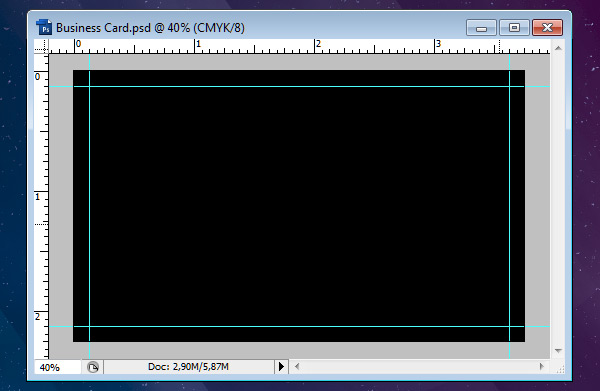
Step 4: Make Some Stars in Photoshop
To imitate outer space, we need stars. Create a new layer for your stars (Shift + Ctrl/Cmd + N), name it “Stars” so that we are maintaining the organization of our business card document, and then make sure this new layer is above the gradient layer. Next, fill the “Stars” layer with black (#000000).
 After that, go to Filter > Noise > Add Noise and set the Amount option to 400%. Then choose the Uniform and Monochromatic options and click OK to apply the filter.
 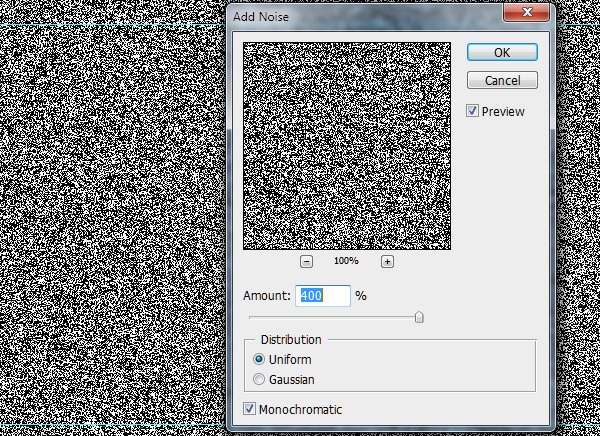 Now we will use a blur filter to soften the noise layer.
Go to Filter > Blur > Gaussian Blur and change the Radius to 0.7 pixels, then apply the filter. 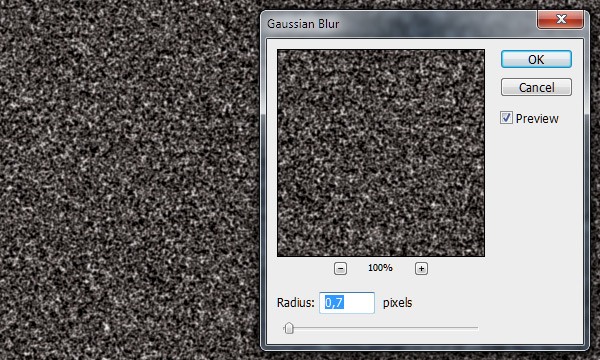 After that, click Image > Adjustments > Levels and play with the Input Levels values a bit to achieve less frequent and more spaced-out stars.
 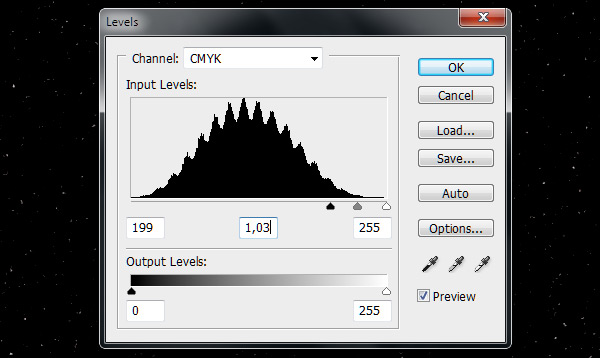 When you are happy with the spacing of your stars, reduce the layer’s Opacity to 50%.

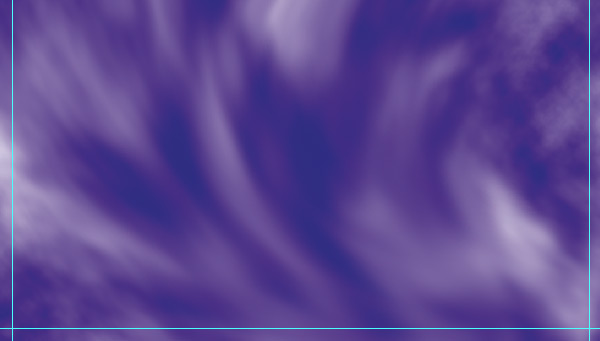
Step 5: Add Some Stardust Using the Clouds Filter
To give our work another space theme, we will create stardust. To do that, first create a new layer for our stardust (you may name this layer as “Stardust”). Next, set the Foreground color to white (#ffffff) and Background color to purple (#4d008f) in the Tools Panel.
With your Foreground/Background colors set, go to Filter > Render > Clouds. 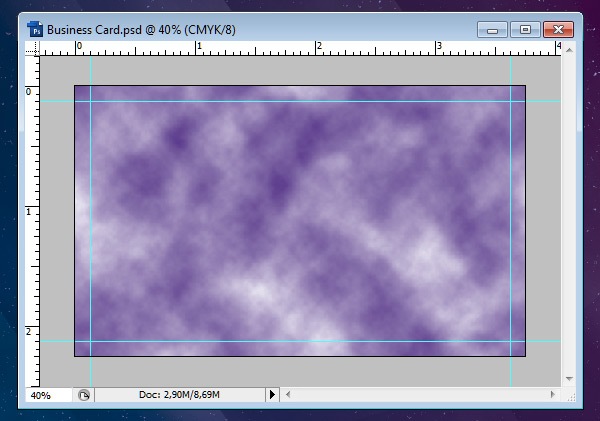
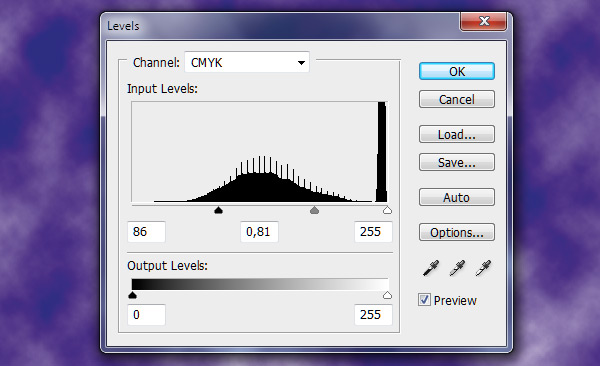
Step 6: Adjust the Stardust’s Vividness
We will use an image adjustment to enhance the color of our image. Go to Image > Adjustments > Levels and play around with the Input Levels values to make your clouds more vivid.
Step 7: Smudge the Stardust
Next, we will smudge our stardust with the Smudge Tool (R) to create a more fluid and blended effect. For the Smudge Tool, choose the Soft Mechanical Brush tip and set the Master Diameter option to 500 pixels (you can set both brush options in the Options Bar). 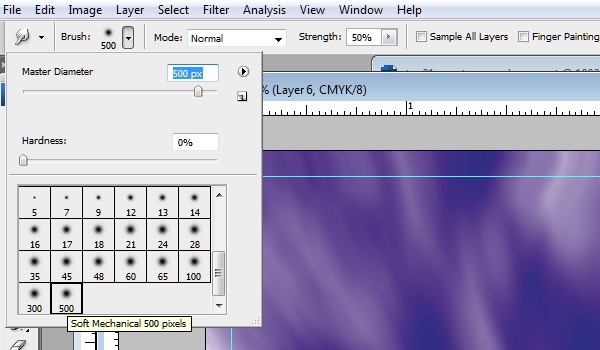 With your Smudge Tool ready for action, smudge your “Stardust” layer to make it look like stardust.
Step 8: Finishing Touches on the Stardust
Set the Blend Mode of the “Stardust” layer to Overlay and also reduce the Opacity to 60%. 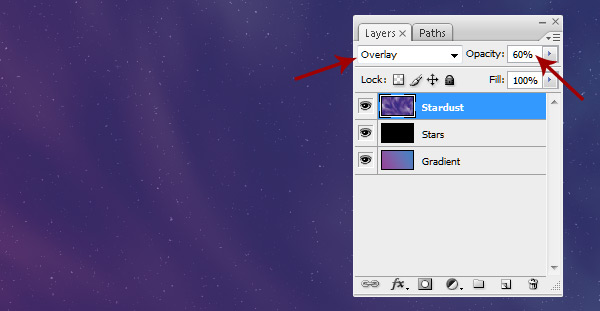 Remember our background with the blue-purple color gradient? Duplicate it (Ctrl/Cmd + J) and then place the duplicate over the “Stardust” layer.
Press Ctrl/Cmd + T (Free Transform) and then scale the width of the background object to -100.0%. After your free transform, set the layer’s Blend Mode to Color. 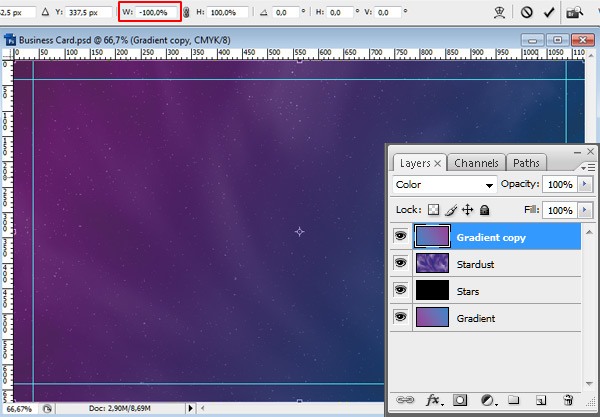
Step 9: Create a Diagonal Strip
Next, we will create diagonal strips to stylize our business card and give it a nice design element.
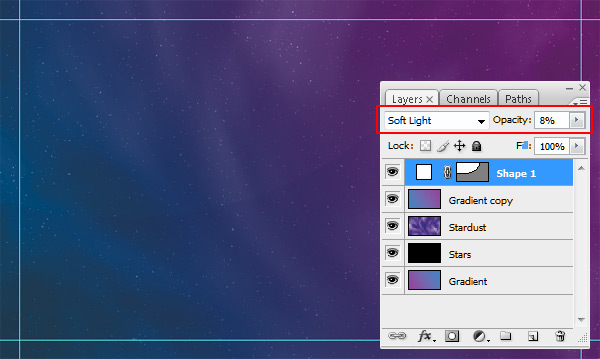
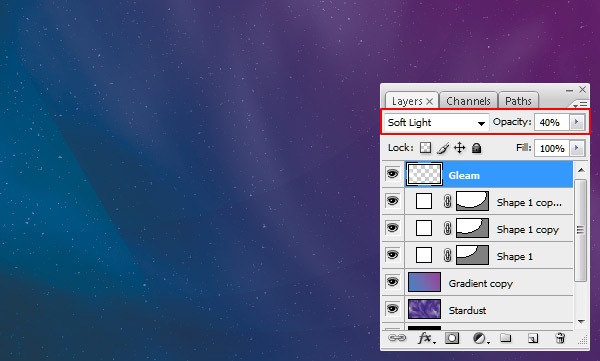
To begin, set your Foreground color to white (#ffffff) and then pick up the Ellipse Tool (U) from the Tools Panel. Then draw a big circle and move it partially outside of the canvas. 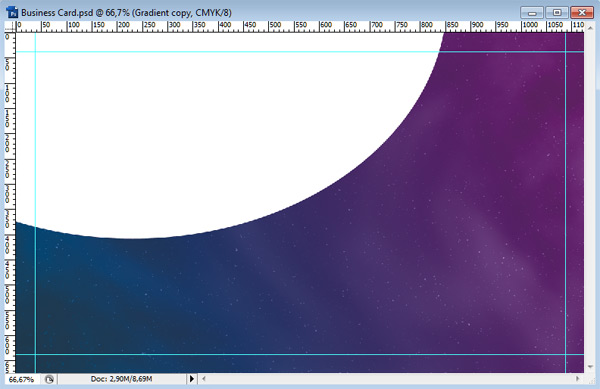 Now change the layer’s Blend Mode to Soft Light and reduce the Opacity to 8%.
 After that, make two copies of the circle layer (Ctrl/Cmd + J). Then move them below the first one.
 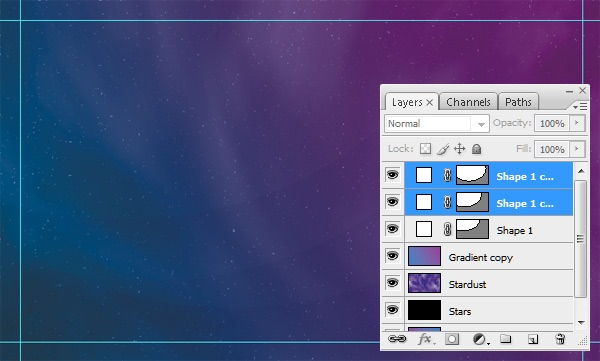 Make sure that your Foreground color is set to white (#ffffff) and then pick the Brush Tool (B), setting the brush tip to Soft Mechanical at 500 pixels Master Diameter.
Click once on the canvas to apply your brush stroke, making a big, white circle. Then use the Rectangular Marquee Tool (M) to make a selection as shown below. 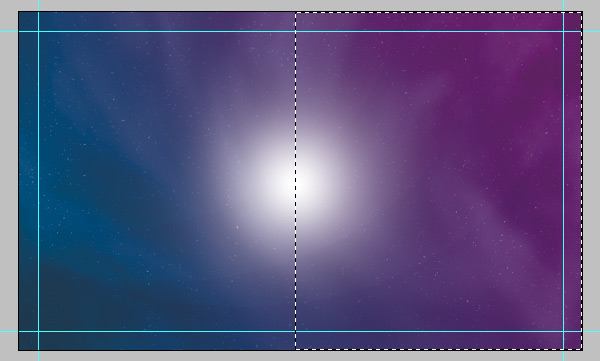 Delete the selected area.
Afterwards, press Ctrl/Cmd + T (Free Transform), and in the Options Bar, set the Angle to -30 (then apply the transformation). 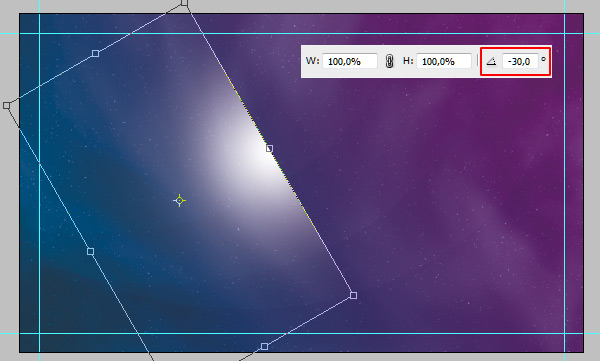 Move the diagonal stripe left using the Move Tool (V). Then blend it better with its background by changing the layer’s Blend Mode to Soft Light and Opacity to 40%.
Step 10: Create More Diagonal Strips
Duplicate (Ctrl/Cmd + J) the diagonal strip layer 6 times and move the copied layers to the right. 
Step 11: Create Colorful Lighting Effects
Create a new layer (name it “Colors”). Use the Brush Tool (B) to make some colorful circles with a soft-tipped brush.
 Now change the “Colors” layer’s Blend Mode to Overlay and reduce the Opacity to 30%.
Step 12: Enhance the Colors with a Gradient Map
Now add a Gradient Map adjustment layer by clicking on the Create new fill or adjustment layer icon that is located at the bottom of the Layers Panel; choose Gradient Map from the menu that shows up when you click the icon. 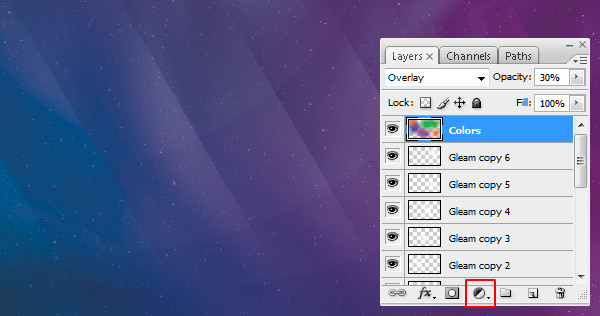 Set the Gradient Map’s gradient such that it goes from black (#000000) to white (#ffffff).
 Change the Gradient Map’s Blend Mode to Pin Light.
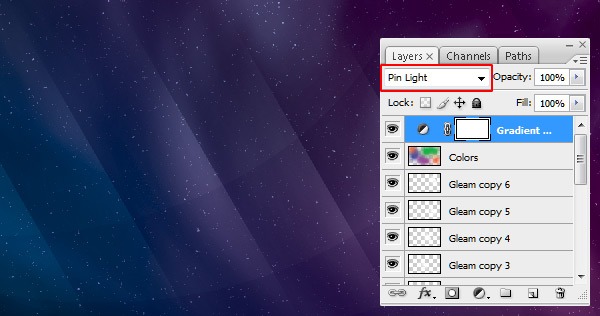
Step 13: Business Card Typography
Last but not least is the text to be placed on our business card. I used a free font called Nevis (by Ten by Twenty).
Start by setting your Foreground color to white (#ffffff). Then use the Horizontal Type Tool (T) to write your name (or your company’s name).  After that, select the text layer from the Layers Panel and then go to Layer > Layer Style > Blending Options.
Add a Gradient Overlay using the following settings. 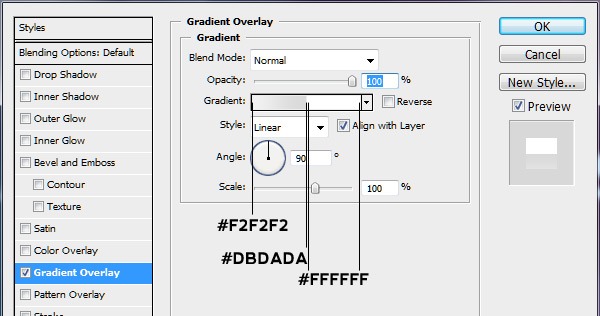 Next, write a description under the name and repeat the styling actions.
 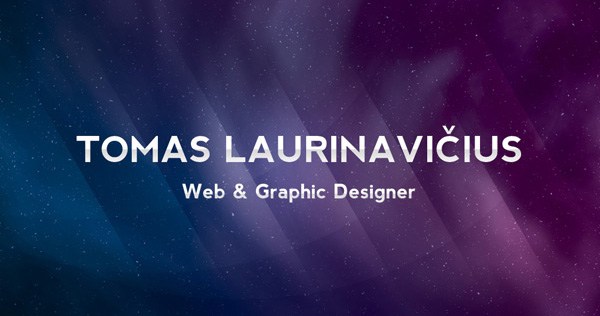 We’re finished with the front side.
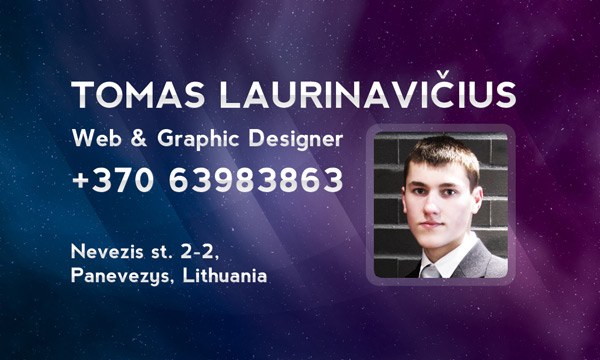
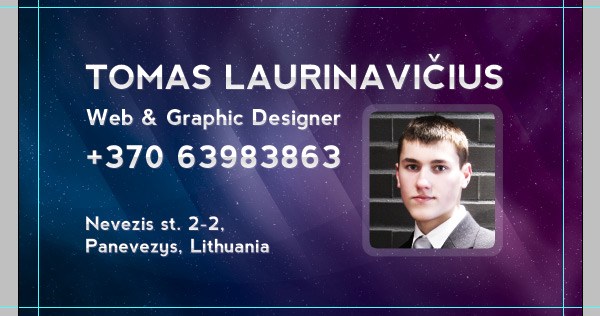
Create a new layer group (Layer > New > Group) and call it “Back”. Place the text for the back side of the business card inside the “Back” layer group. Add some text describing your work, skills, and contact information. You can put your photo here as well to personalize your business card.
Tutorial Summary
Congratulations, we have finished our business card! This tutorial showed you an easy way to create a business card design that will surely attract the attention of those you hand it to. We made a space-themed background that has stars and stardust.
We also designed a cool set of diagonal strips to accent the business card, and then finished it up with a nice Gradient Map adjustment layer. Then the Horizontal Type Tool came to our aid as we placed our name and other business card information on it. Before heading out to the printer to get your business card printed, be sure to read the tutorial called A Guide to Preparing Files for Print.
Download Source Files
- spacethemed_business_card (ZIP, 5.80 MB)
-
 Trevin serves as the VP of Marketing at WebFX. He has worked on over 450 marketing campaigns and has been building websites for over 25 years. His work has been featured by Search Engine Land, USA Today, Fast Company and Inc.
 -

WebFX is a full-service marketing agency with 1,100+ client reviews and a 4.9-star rating on Clutch! Find out how our expert team and revenue-accelerating tech can drive results for you! Learn more
Make estimating web design costs easy
Website design costs can be tricky to nail down. Get an instant estimate for a custom web design with our free website design cost calculator!
Try Our Free Web Design Cost Calculator
Table of Contents
- Preview
- Tutorial Resources
- Step 1: Create a New Photoshop Document
- Step 2: Add Some Guides
- Step 3: Create the Gradient Background
- Step 4: Make Some Stars in Photoshop
- Step 5: Add Some Stardust Using the Clouds Filter
- Step 6: Adjust the Stardust’s Vividness
- Step 7: Smudge the Stardust
- Step 8: Finishing Touches on the Stardust
- Step 9: Create a Diagonal Strip
- Step 10: Create More Diagonal Strips
- Step 11: Create Colorful Lighting Effects
- Step 12: Enhance the Colors with a Gradient Map
- Step 13: Business Card Typography
- Tutorial Summary
- Download Source Files
Share this article


Web Design Calculator
Use our free tool to get a free, instant quote in under 60 seconds.
View Web Design CalculatorMake estimating web design costs easy
Website design costs can be tricky to nail down. Get an instant estimate for a custom web design with our free website design cost calculator!
Try Our Free Web Design Cost Calculator


