

Tutorial Preview

Tutorial Resources
| Download Link | Type | Author |
| scratched 5 | Texture | Lost and Taken |
| League Gothic | Font | The League of Moveable Type |
Step 1: Create a New Photoshop Document
We are going to create a new 1200x600px document in Photoshop. 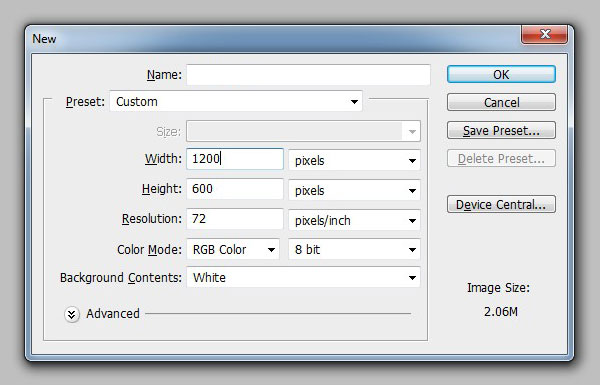
Step 2: Create the Background
First, fill the Background layer with gray (#666666). Next, we are going to use a scratched texture image to give our background an interesting surface texture.
Download the texture I linked to — or browse through Design Instruct’s free textures, pick one you like and download that instead — and place your texture in your Photoshop document, right above the Background layer. In the Layers panel, change the Blend Mode of the texture layer to Soft Light and lower the Opacity to 10%. 
Step 3: Create the Text
Our text is going say “TYPE”. You can use the Horizontal Type Tool (T) to create your text. We’ll use the League Gothic font.
We’ll set our font size to around 500pt. After we’ve created our text, we’re going to convert our text to pixels by going to Layer > Rasterize > Type. 
Step 4: Draw the Split-flap Base Shape
Create a new layer for the split-flap base shape that we’ll draw with the Rounded Rectangle Tool. Switch to the Rounded Rectangle Tool (U) located in the Tools panel.
In the Options bar, set the Rounded Rectangle Tool’s mode to Shape layers and Radius to 15px. Draw a box around the first letter, giving some room on all the edges of the box for the other split-flaps of the other letters. The box should be behind the letter, not on top of it.
 Later on, we’ll duplicate the first finished split-flap for the rest of the letters. Once you’ve drawn your first split-flap base shape, put it in a layer group by first making sure it’s the active layer in the Layers panel, and then going to Layer > Group Layers. Rename the layer group to “Flap 1” to keep our work organized.
Step 5: Layer Style of the Split-flap Base Shape
We’ll give the split-flap base shape these three layer effects: Gradient Overlay, Drop Shadow and Stroke. We’ll be using a layer style to do this. Below are screenshots for each layer effect.
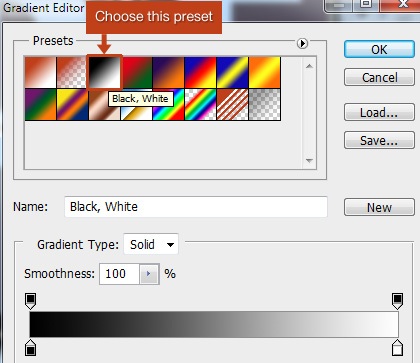
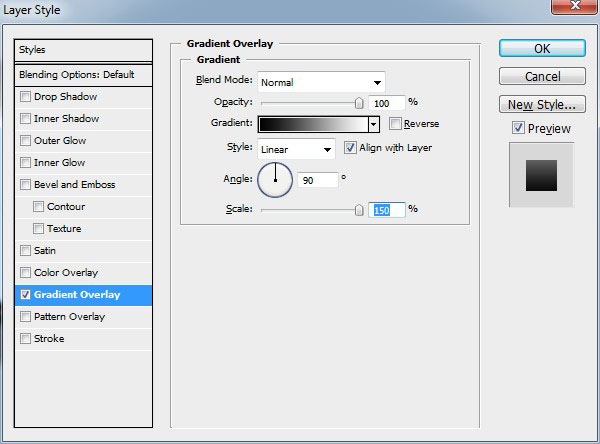
Gradient Overlay Select the split-flap base shape layer in the Layers panel and then go to Layer > Layer Style > Gradient Overlay. In the Gradient Overlay window, change the Style option to Reflected. Then, click on the Gradient preview to open the Gradient Editor. 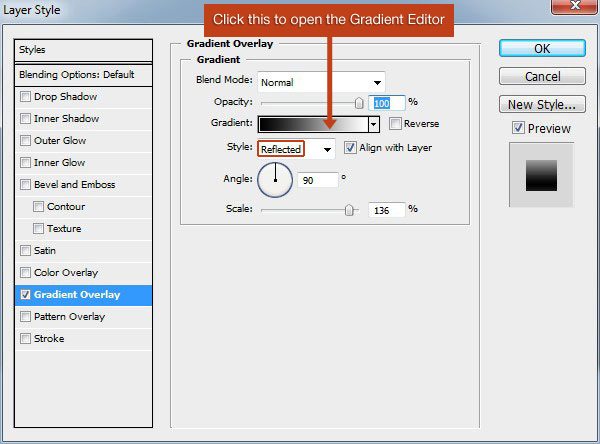 In the Gradient Editor window, choose the Black, White gradient preset.
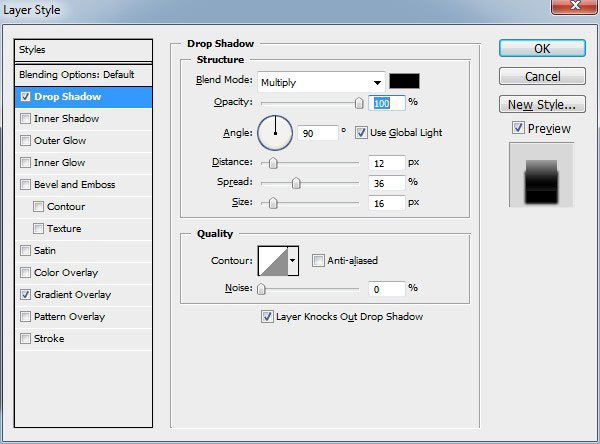
 Drop Shadow Now we’re going to add a Drop Shadow effect to our layer style. We’re going to give the split-flap base shape a heavy shadow to make it pop out from its textured background a little more. Do this by going Layer > Layer Style > Drop Shadow.
 Stroke Finally, we are going to add a 4px stroke to the split-flap base shape. Do this by going to Layer > Layer Style > Stroke.
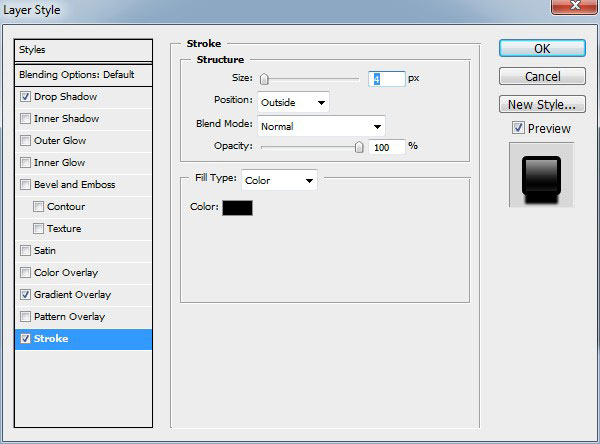
Step 6: Create the Inner Split-flap Shape
To make it easier to work with, lets first rasterize our split-flap base shape layer by going to Layer > Rasterize > Shape.
Then, in the Layers panel, make sure that the split-flap base shape layer is still the active layer. Afterwards, go to Select > Load Selection. This should create a marquee selection around the shape.
We will shrink the marquee selection using Select > Modify > Contract. Set the Contract By option to 5px in the dialog window that appears. Then, create a new layer by going to Layer > New > Layer.
In the new layer, fill (Edit > Fill) the contracted marquee selection with black (#000000). This is our work so far: 
Step 7: Duplicate the Top Half of the Inner Split-flap
To start creating the appearance that the split-flap is divided into two pieces, we will duplicate the top portion of the inner split-flap in a new layer and give it its own layer style. First, we want to find the center of the inner split-flap.
Here’s an easy way to find the center: Go to Edit > Free Transform and make sure that the Show Transform Controls option in the Options bar is checked. Then create a horizontal guide by dragging to the center of that shape; this will only work if your rulers are visible in your Photoshop workspace, so if you can’t see your rulers, go to View > Rulers. 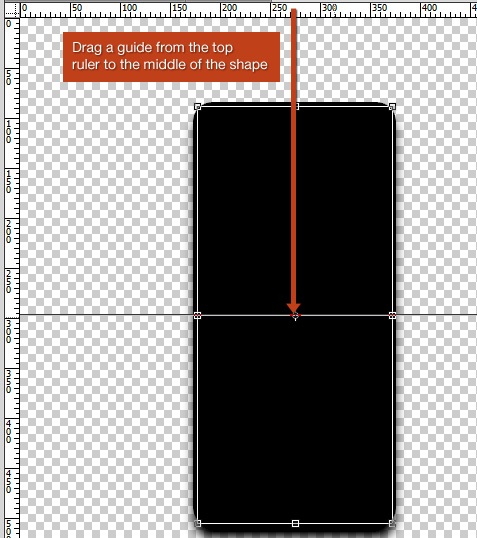 Using the Rectangular Marquee Tool (M), draw a marquee selection around the top half of the split-flap.
Afterwards, go to Layer > New> Layer via Copy. That will automatically make a new layer with the part of the inner split-flap that we drew a marquee selection on.
Step 8: Give the Top-Half of the Split-flap a Gradient Overlay
In the Layers panel, make sure the top-half of the split-flap layer is the active layer and then go to Layer > Layer Style > Gradient Overlay.
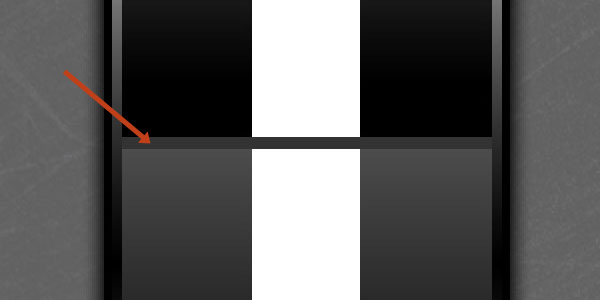
Step 9: Create the Split
Create a new layer on top of the text layer. Create a marquee selection using the Rectangular Marquee Tool (M) that’s about 200px wide and 6px tall. Fill the rectangle selection with a gray color: #333333. Using the Free Transform Tool (Edit > Free Transform) adjust the edges so the rectangle fits inside the split-flaps.
Step 10: Create the Hinges
Next we are going to make the hinges that the split-flaps are attached to. First, create a new layer. On the new layer, create a 6x25px rectangle using the Rectangular Marquee Tool (M) and fill (Edit > Fill) it with black.
Now, give them the same Gradient Overlay as the split-flap base shape layer. Duplicate the layer we just created (Layer > Duplicate Layer) and move it to the right of the split-flap. In the Layers panel, select the split layer (the gray horizontal line at the middle of our split-flap) and the two hinge layers.
Place these 3 layers in a layer group by going to Layer > New > Group from Layers, and then name the new layer group “Split 1”. 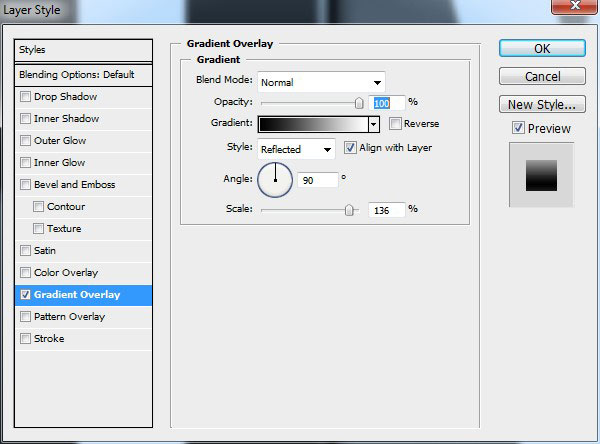
Step 11: Duplicate the Split-flap for the Rest of the Letters
Now we are going to take the “Flap 1” layer group and duplicate it by going to Layer > Duplicate Group. Change the name of the duplicated layer group to “Flap 2” to keep our work organized. Use the Move Tool (V) to place the split-flap behind the letter “Y”. Repeat this for the next two letters until you have split-flaps behind all the letters (change the duplicated layer group names to “Flap 3” and “Flap 4”). 
Step 12: Duplicate the Split Group
Next, duplicate the “Split 1” layer group using the same method described in the previous step. Change the layer group name to “Split 2”. Move the group so it is on the next split-flap letter. Repeat the process outlined above for the last two split-flap letters. Change the duplicated layer group names to “Split 3” and “Split 4”. 
Step 13: Add a Glow Effect
Set your foreground color to white (#ffffff). 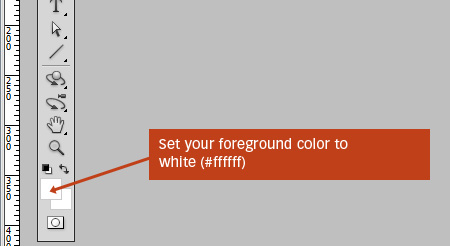 Choose the Gradient Tool (G) in the Tools panel. In the Options bar, choose the Radial Gradient option.
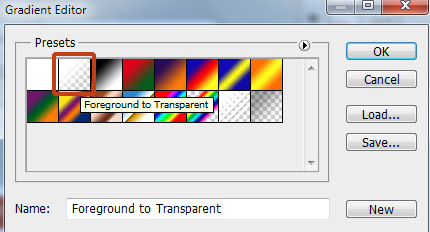
Also in the Options bar, click on the gradient sample to open the Gradient Editor. 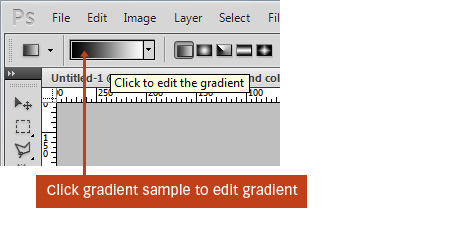 Choose the Foreground to Transparent preset in the Gradient Editor. This will allow us to create a gradient that goes from white (our foreground color) to 0% opacity.
 Our Gradient Tool is now set up and ready to go. Create a new layer on top of all the other layers. Create a white to transparent gradient on the new layer, starting at about the center of our canvas.
Use the Free Transform Tool (Edit > Free Transform) to stretch the gradient so it goes to the edges of the canvas, making the glow shaped like an oblong. Afterwards, change the Blend Mode of the glow layer to Soft Light. 
Step 14: Create an Edge Inner Shadow
Create a new layer for the inner shadow that will be placed at the edges of our canvas. Switch to the Rectangular Marquee Tool (M).
Change the Feather option to 50px in the Options bar. Place a marquee selection around the entire canvas by choosing Layer > Select All. We want the marquee selection to be on the edges, so let’s invert the selection by going to Select > Inverse.
Fill the selection with black. 
Step 15: Add Some Color
This is the last step. In this step, we’re going to give our work a little color.
In the Layers panel, choose the topmost layer to ensure that you’re on top of the layer stack. Afterwards, go to Layer > New Adjustment Layer > Gradient Map. Change the gradient of the Gradient Map adjustment layer to a yellow and purple and check the Reverse option to make sure the yellow colors cover the white colors and the purple covers the darker colors.
Change the Blend Mode of the Gradient Map adjustment layer to Color and drop the Opacity to 50%. 
Tutorial Summary
In this Photoshop graphic design tutorial, I showed you a way to create the popular split-flap display. We used a ton of Photoshop features such as layer styles, adjustment layers, the Gradient Tool, Rectangular Marquee Tool, and much more. I hope you found this tutorial useful.
If you have questions about any part of the tutorial, please pose them in the comments!
Download Source Files
- split_flap_display_photoshop (ZIP, 3.42 MB)
-
 Trevin serves as the VP of Marketing at WebFX. He has worked on over 450 marketing campaigns and has been building websites for over 25 years. His work has been featured by Search Engine Land, USA Today, Fast Company and Inc.
 -

WebFX is a full-service marketing agency with 1,100+ client reviews and a 4.9-star rating on Clutch! Find out how our expert team and revenue-accelerating tech can drive results for you! Learn more
Make estimating web design costs easy
Website design costs can be tricky to nail down. Get an instant estimate for a custom web design with our free website design cost calculator!
Try Our Free Web Design Cost Calculator
Table of Contents
- Tutorial Preview
- Tutorial Resources
- Step 1: Create a New Photoshop Document
- Step 2: Create the Background
- Step 3: Create the Text
- Step 4: Draw the Split-flap Base Shape
- Step 5: Layer Style of the Split-flap Base Shape
- Step 6: Create the Inner Split-flap Shape
- Step 7: Duplicate the Top Half of the Inner Split-flap
- Step 8: Give the Top-Half of the Split-flap a Gradient Overlay
- Step 9: Create the Split
- Step 10: Create the Hinges
- Step 11: Duplicate the Split-flap for the Rest of the Letters
- Step 12: Duplicate the Split Group
- Step 13: Add a Glow Effect
- Step 14: Create an Edge Inner Shadow
- Step 15: Add Some Color
- Tutorial Summary
- Download Source Files
Share this article


Web Design Calculator
Use our free tool to get a free, instant quote in under 60 seconds.
View Web Design CalculatorMake estimating web design costs easy
Website design costs can be tricky to nail down. Get an instant estimate for a custom web design with our free website design cost calculator!
Try Our Free Web Design Cost Calculator


