
In this tutorial, you'll learn to design a realistic calligraphy pen from scratch. The tutorial involves a simple use of the Pen Tool and a few flexible Layer Styles. Lighting and reflection techniques are explained throughout the tutorial. This might be a quite useful for icon enthusiasts. Let's dive in...
Step 1
Create a new document with these settings:

Step 2
Create a new layer set and name it "Pen". Select Pen Tool (P) and draw a shape like one below. Before making the shape, make sure to select "Shape Layers" option from Options bar. Name this shape as "base" and give it a Gradient Overlay of gray shades.

Step 3
Draw another shape using Pen Tool and name it "body".

Step 4
You need to add some reflections to the body. Create a new layer and Command-click on "body" layer, fill the selection on the new layer with white. Press Ctrl+T and reduce the width of the new layer to 75%. Now go to Filter > Blur > Motion Blur ,click OK after making the settings shown below. Finally, reduce opacity of the layer to 50% and give it a Gradient Overlay.

Step 5
Use Rectangle Tool (U) or Pen Tool (P) to make a shape like one below and name it "neck" for convenience. Give it Layer Styles as mentioned.

Step 6
Just like the body of the pen, add reflections to the neck but while doing so, change the opacity of first reflection layer to 75% and that of duplicate layer to 100%, keeping size reduction proportions same.

Step 7
Using Pen Tool (P), make a curved strip as shown.

The strip looks very smooth but actually it has got some aliasing which can create problems in the forthcoming steps. To fix this, right-click on the shape layer and select "Rastersize" from the menu. Now apply these filters to the layer:
Filter > Blur > Gaussian Blur (Radius = 0.5 px)
Filter > Sharpen > Sharpen Edges
Next, give the strip these layer styles.

Step 8
Create a new layer (name it "shadow") and place it below "strip" layer. Command-click on strip layer and go to Select > Modify > Expand, type 2 px and click OK. Now fill the selection with black on the "shadow" layer. Next, apply Filter > Blur > Gaussian Blur (Radius = 0.5 px) to the layer.

A part of the shadow is overflowing on the pen's body. To eliminate it, first Command + Click on the "body" layer, then Command + Shift + Click on the "neck" layer. Go to Select > Modify > Contract, type 1 px and click OK. With the "shadow" layer selected and the selection loaded, press Command + Shift + I and hit Delete.

Step 9
Create a shape like the one shown below using the Pen Tool (P) and give it a Gradient Overlay of the same colors as the ones we used for the "base" and "strip" layers.

Step 10
On a new layer, fill a selection with black using Rectangular Marquee Tool and Elliptical Marquee Tool as shown below. With the layer selected, go to Layer > Add Layer Mask > Reveal All. Drag a black to white gradient as directed.

Step 11
Use Step 7 and Step 8 to add a strip and its shadow over the nib, as shown.

Step 12
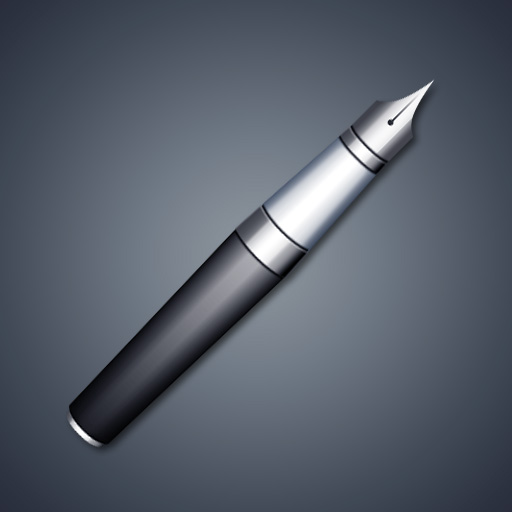
Right-click on the "Pen" layer set and select "Duplicate Layer Set" from the menu, click OK as the dialog box pops up. With duplicate layer set selected, hide the original layer set (as a backup copy) and press Command + E. By doing so, all the visible layers of the layer set will be merged into one layer. Go to Edit > Transform > Rotate, rotate the layer by 45 degrees clockwise. Finally, give some layer styles to the pen.

That's it :). I hope you learned something new from this tutorial.


