
 Create an Epic Storm at Sea Scene in Photoshop
 Members Area Tutorial: Create a Fiery, Dynamic Basketball Photo Manipulation
 Draw a Detailed Printer Illustration From Scratch in Photoshop
Have every post delivered to your inbox and get access to hundreds of useful design freebies.
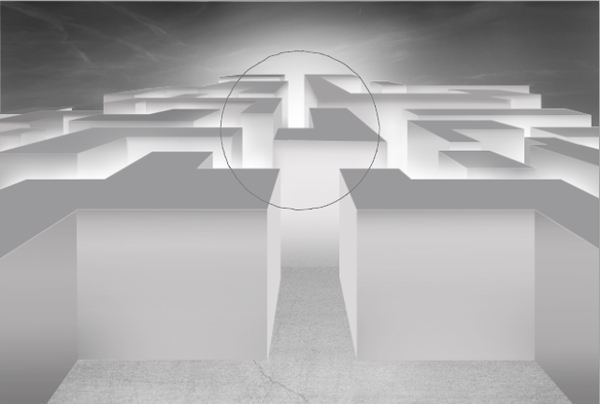
If you love creating abstract, visually awesome work in Photoshop, then this tutorial is for you. Learn how to create a surreal scene featuring a giant maze, constructed by 3D blocks.
You’ll learn all kinds of techniques, such as working with perspective, applying texture and lighting and much more.
Let’s get started shall we?
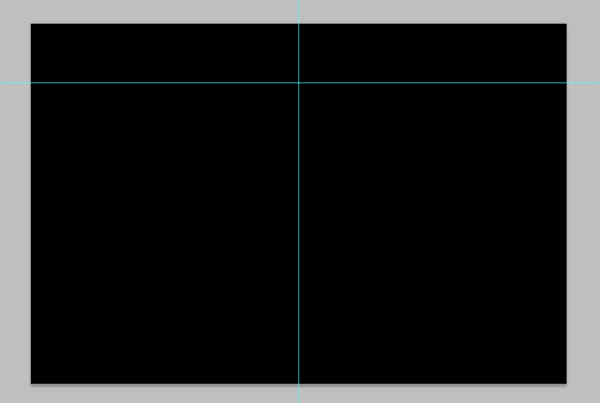
Here’s a look at the outcome you’ll be able to produce by the end of this lesson:

Start by creating a new document (Ctrl+N) for scene we are going to create. Let the document be 2500 pixels wide and 1681 pixels high. Firstly, fill (Shift+F5) the document with black.
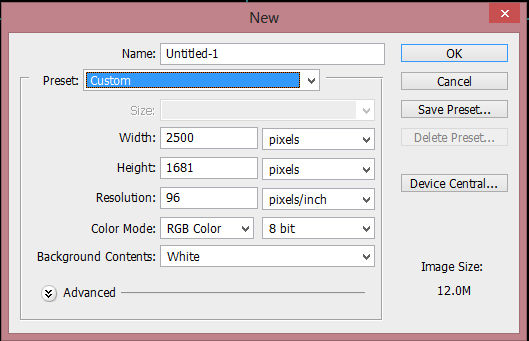
Go to view in the menu bar and make sure to check ‘extra’ in the option box given. Then, click ‘show’ to come another option box up. Make sure to check ‘guide’ in the box.

Now create crossing guide lines as shown in the screenshot below:
Proceed to create some other lines which will be used as guide lines to draw maze like shape. To do this purpose, activate the line tool in the tool panel. Set its weight to 3 pixels.

Start to create the guide lines as shown below. I used red for the color of the lines.

After creating the lines on the left part, merge the lines into a single layer. Duplicate (Ctrl+J) the layer and flip the duplicate horizontally. Move it to the right part of the document to have the guide line as shown in the screenshot. Merge the two line layers into a single layer. I named this layer lines.

Reduce the opacity of this lines layer to about 40%.

Now we are ready to create the shape. Create a new layer (Shift+Ctrl+N). I named this layer block shape 1. Take the pen tool and with the tool, create rectangular path on this shape 1 layer. Make sure to follow the guide lines to have right perspective of the shape. Right click on the path to show the path option box. Choose fill path.

Fill the path with color of #9a9a9b

Here is what we have now:

Next we will create another rectangular shape on the left side. Create the other two guide lines crossing the leftmost corners (line 1 and 2) and another guide line (line 3) crossing the two lines.

Create a new layer below the shape 1 layer. I named this layer shape 2. By following the lines previously made, create rectangular shape with the pen tool as we did in previous step 3. I fill the shape with lighter color as shown in the screenshot:

Finish the shape by creating the two other rectangular shapes. Remember to always follow the guide lines to keep the perspective of the shape. I created these two layers on different layers. I named these layers shape 3 and shape 4.


Here is the result I created:

Proceed to give the shape some shading. Create a new layer above the shape 3 layer. Make sure to give this new layer a clipping mask.

Take gradient tool in the tool panel and choose linier gradient with opacity of about 15%. Make sure to set the foreground color to black. Open the gradient editor and choose foreground to transparent gradient.

Start giving some shading on the shape 3 layer by hold- clicking the gradient on the top of the image and drag downward a bit.

Give some shading to the shape 4 where needed as well.

Now we will add some line on the shape 1. Go and select the shape 1 layer again. When we are still active on the shape 1 layer, go to layer > layer style > stroke:

Here is the result. Select all the shape layers and merge them (Ctrl+E) into a single layer. I named this layer front right block.

Create another front block on the left with the same techniques as we did the previous front right block.


Then, again create the middle front block. Select all the front block layers and hit Ctrl+G to group them into a folder. I named this folder front block.

With the same way as we did in previous steps, create some rear blocks on the left side. Here are the first three blocks I created and named them as block 1,2 and 3.

I finished the rear left side by creating some other blocks:

Proceed to create some blocks on the rear right side. I Created 7 blocks for this side.
Next we will add some white light between the aisles of the blocks. Let’s start giving the light on the aisles behind the right front block. To achieve this, create a new layer behind the right front block layer. Take a very soft round brush set to 20-30% opacity. On the new layer, paint the soft white light as indicated by the blue arrows.

Give some white light behind the aisles behind the left front block as well.

Here is the result I created after I gave some light on the aisles of the rear left blocks.

Do the same way to give some light on the aisles of the right rear block. After finishing the maze, select all the block layers and merge them into a single layer. I named this layer maze.

Now we are going to create background for the scene. Take the linier gradient again. Make sure to set the foreground color to black and the background to white. Choose the foreground to background gradient in the gradient editor.

Next, change the black background by filling it linier gradient color of black and white. Here is the result I did:


Open the texture image on the document. Position this texture image above the background layer. Take free transform tool and scale its size to cover the background.

Move the texture downwards so it is supposed to be the ground of the maze.

Reduce the opacity of the texture layer to about 65%.

Give this texture a layer mask by clicking the mask icon located at the bottom of the layer panel.

Take a very soft round brush set to about 15-20% opacity. With black color, stroke the brush on areas around the texture to give it some masking. Here is the mask I created on the texture.

And here is the masked texture now:

Duplicate the texture layer and set the duplicate to soft light blending at 50% opacity.

Open the sky image on the document. Scale its size and position it above the texture layer.

Give this sky layer a layer mask and mask some part of this sky image.

With the sky layer still selected, go to layer > new adjustment layers > hue/saturation. Make sure to give this hue/saturation layer a clipping mask.


Here is the result:

Create a new layer above the sky layer. Take again a very soft round brush at size of about 800-900 pixels. With color, paint some white light behind the maze. I named this layer light. We can duplicate this layer and set the duplicate to soft light to get more vivid light.
Proceed to work on the maze. Select the maze layer and mask some part of this layer as indicated in selection in the screenshot.

Here is maze will look after being masked.

Duplicate the maze layer and position the duplicate above the original layer with a clipping mask. Mask some part of the duplicate and set it to multiply at 75% opacity.

Then, duplicate again the texture used in the background. Place the duplicate above the maze copy layer with a clipping mask. Scale its size.

With the texture layer still selected, go to filter > other > high pass. Then set this texture layer to soft light at 70% opacity.

Here is the result. Select all the maze layers and group them into a folder. I named this folder maze.


Create another new layer above the maze folder. On this new layer, paint soft white light in front of the middle front block as indicated in selection in the screenshot.

Here is what I created:

Finally, we will alter the overall color of the scene. We do this by just simply giving new adjustment layers: color balance and photo filter on the topmost position in the layer panel.

Set the color balance layer to normal at 100% opacity and photo filter to normal at 50% opacity:

Awesome job making it this far! You should be proud of what you’ve created. Show it off to your friends and colleagues and get some feedback.
You can also comment here with your version, or any questions you had about the techniques used. We love to see what you guys create and we’re always here to give helpful feedback and tips to help you to improve.
The source files for this tutorial are available to our FanExtra members community. If you want to access the source files for this tutorial (and all of our tutorials + thousands of other resources) then sign up here.
If you’re already a FanExtra member then you can login here to access the source files.

I am a self-taught photoshop hobbyist from Bali, Indonesia. Photo manipulation is something I am keen on most and a music lover as well. Meet me here http://wprabu.blogspot.com/


Do you know the basic tools in Photoshop but feel that your work is still looking average? Join our creative community at FanExtra and get the direction you need to take your work to the next level.


Leave a comment
0 Comments:
No comments have been posted yet. Be the first!